Wednesday, February 27, 2013

Rinzler Suit part 1

Starting to work on the Rinzler suit.

So far I have a pattern for the chest that was made on a few pieces of paper, then cut out and transferred to a large piece of paper

So here we have


Also on the note of costumes, I have been asked to make a tutorial on painting foam armor to give a metallic shine, such as the Iron Man armor. Stay tuned, it will come pretty soon!

Friday, February 22, 2013

Tron Disc

Well tomorrow is our local Armor Party, and I will be working on the Tron discs. I will be sure to post up some pictures of the results.

Until then here is something to look at, its some inspiration for the costumes!


Tuesday, February 19, 2013

Whats Up

Hello everyone.

Just giving a update to whats coming next. The Hylian Shield tutorial part 3 will be delayed slightly as I want to figure out exactly what I would and can do with the back side of the shield.

However, I will be providing a basic LED tutorial and information post very soon. I have seen that many of my friends struggle with knowing what to do for LEDs, so I feel its only right to make my knowledge accessible to them, as well as anyone else who reads this blog.

I will also be demoing some other projects and products that I am making and/or using. Some include modding a SpinMaster Tron disc, EL tape, Pepakura information, and a review of a new product from My good friend Ryan aka TheRealStark.

Last thing I would like to mention is I will writing my first movie review in March. It will be for Oz: The Great and Powerful. This will be somewhat of a bias review, but with good reason. The movie is released on March 8th, my birthday, and I tend to go easy on movies that come out on that day! This is a warning that it might be bias.


http://dribbble.s3.amazonaws.com/users/6303/screenshots/590187/tron_disc_2.png

Sunday, February 17, 2013

Tron Update

Well I broke down and ordered some EL tape.

I have the entire EL tape set for my Rinzler costume as well as some of the parts we know for sure Val will need for her Quorra. Once we make some more progress on the Quorra suit we will get the rest needed.

The reason Rinzler was easy is because there is a store in the UK that sells a complete EL tape kit for Rinzler. Quorra on the other hand, dose not have a kit available that I have found. So I don't want anyone thinking that I am putting my costume in front of Val's. They are both equally important to me and they will both be complete by Denver Comic Con 2013!

Hylian Shield Tutorial part 2

Alrightly, well here comes part 2 of the Hylain Shield Tutorial


Shopping list for part 2
Silver Leaf Rub n Buff
Ruby Rub n Buff
Black spray paint
Blue spray paint
Glue gun ans glue sticks
Small wooden buttons
Utility knife and scissors
Pencil and marker
Yard stick
And everything from part 1

First up I will show you how much curve I got from part 1, I didn't get a good pic last time


This should give a good example to how much curve you need from the shield


Next I took the second outline that I had left over from part 1. I free handed a outline in pencil the basic shape I wanted the boarder to be.

Once I had a basic shape, I used my yard stick to make sure everything was square and lined up correctly. After I was satisfied with the boarder, I filled it in with marker. 


Next step was to cut out the boarder with the utility blade. I would recommend making sure it is the right size after cutting.


After checking to make sure everything lined up and looked right, I finished cutting out the foam parts from part 1


Now for the fun... I used Ruby Rub n Buff on the bird. This gave it a great copper color. The copper is what I wanted from this, as I am going for a real world look. If you are going for a game look I would use red spray paint. Also I finished up the top detail pieces with Silver Leaf Rub n Buff.


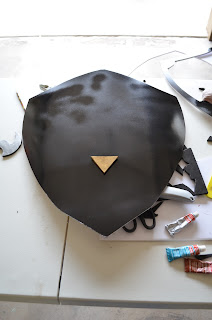
The next step was to paint both the shield and boarder with black spray paint.


My original intention was to use a mixture of Patina and Sapphire Rub n Buff for my blue color on the shield. However, I must have a bad tube on one or both of the colors. It looked horrible and I was not happy. Therefor, I went with blue spray paint for the main base of the shield. If you want to just do the blue paint and not risk a bad color from Rub n Buff, just skip the last step of painting the shield black. The boarder should still be painted black however.


With everything painted, I glued the boarder and detail parts where they need to go. The boarder was a bit tricky as it was not curved. I used some clamps to hold it in place as I glued.

Finish up with Silver Leaf Rub n Buff on the boarder and edges and you should have something like this!


Note I added some Silver Leaf Rub n Buff to the blue section to add some weathering.


Stay tuned for part 3, where I will go ever finishing up the back side with color, leather straps, and anything else neat I come up with!


If there is another prop you would like to see how to make, just post a comment! I am always looking for new items make, I would LOVE to show my process of making them for others to enjoy!


First Commission!

During Galaxy Fest 2013 here in Colorado Springs, I was able to pick up my first real major commission. I have been making the Steampunk Nerf guns for people for a while, but this is something new.

I will be making a fully working Hell Boy ROD(Right-Hand Of Doom)
This will require some interesting ideas to be able to have the fingers move and still maintain the look.

I will post progress pictures as I work on the hand!

Deadline is May 31st for Denver Comic Con 2013

Hylian Shield Update

Part 2 of the tutorial coming TODAY!!!!

Sunday, February 10, 2013

GalaxyFest ~ Saturday

Had a great time yesterday at GalaxyFest. I entered the Iron Man suit into the costume contest. They only did prizes for the top 2 in each category, and thus I didnt win anything. If they did top 3 I would have placed 3rd. Hears hoping for next year!

On that note, I am off for another day!

Saturday, February 9, 2013

Hello All ~ GalaxyFest

I will not be making a update to the shield tutorial this weekend due to a local convention that I am attending.

Just a heads up!

Sunday, February 3, 2013

Hylian Shield Tutorial part 1

So today starts the tutorial on the Hylian Shield.

First up I am going to bring up again that this is going to have a more real world color set and not as bright and clean as the game shield.

Each part of the tutorial will have a shopping list

Shopping list for Part 1
2 foam core poster boards
1 12x18 piece of EVA or craft foam, I used the thicker kind
A water spray bottle
Gold Leaf Rub n' Buff
A piece of newspaper
Pencil and a marker
320 grit sandpaper
Utility knife and scissors


To start, I unfolded the newspaper, and with some reference images, I drew out the basic shape I wanted for the shield. I then cut out the new paper.


Next I traced out the design onto the the first piece of poster board


I then used the utility knife to cut out the shield. I also used the sandpaper to sand down the edges to make them smoother and round out any jagged points


After this point, I felt I needed to make a second cutout of the shield in case of mishaps. I used the shield that I cut out of the poster board top trace the next one.

Now After completing the shield to beyond where part 1 of this tutorial without mishaps to the first cutout, I am glad that I made a second one for something else that will be in part 2 or 3


Once I got both traced, and the first cut out, I wanted to give the shield a concave look. To do this, I propped it up on some RedBull cans and wet down both sides lightly with water from a spray bottle. I then added some weight to the top so that when the water soaks into the poster board, it will give me the desired shape. I left the weight on the shield until it was every so slightly beyond where I wanted the curve to be. Then I removed the weights and let it dry.


During the time that the poster board was setting up for the concave shape, I took my foam and traced some templates for the different designs that go into the shield. I found a template on Google images that I liked and re-sized to fit. This took a lot of trail and error to get the size right, but I think it will be worth the hassle!


With the Tri-Force and smaller triangle cut out of the foam, I used some of the Gold Leaf Rub n' Buff to color them. I like the Rub n' Buff for this because you can give a lot of control to how much you want to use, and its a very nice and real looking color that will help with my desired finish. 


This concludes part 1 of the Hylian Shield tutorial
Stay tuned for part 2!

Saturday, February 2, 2013

Tutorial Choice

Well I didnt get any messages or comments on what tutorial people wanted to see :-(

But thats ok, you get to see what I am making then! Over the next week I will be putting together a tutorial on how to make a Hylian Shield from The Legend of Zelda. Now I will be taking a slightly different approach to the shield. I want to make it look more real world than the cartoonish look of the games.

Stay tuned!

Photo from Zelda.wiki